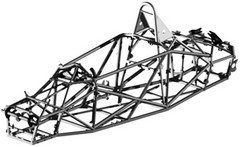
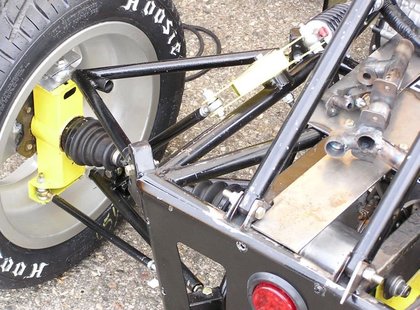
I have never made any secret of my preference for space-frame chassis in FSG. This preference is not because of some nostalgic feeling, but for very pragmatic reasons.
The thing I like most about a space-frame structure is that it really educates the designer in management of the load paths! It is an educational tool par excellence. Some professors will not permit their teams to consider any other structure for this very reason.
Sure, I understand why teams want to use the latest technology and build carbon composite chassis, but unless the team are very experienced and well funded, the results can be catastrophic. The reason why I say ‘well funded’ is not because carbon fibre is expensive…the cost these days is very reasonable, but because of the costs in the design and manufacturing stage. And the cost of the inevitable changes along the way!
Other benefits of a steel structure include ease of repair or modification, access to components and probably an easier time in Tech Inspection.
I know there are teams who will disagree with me, but remember, these cars are being designed and built by students as an educational exercise and as a secondary aim, to compete in a FS or FSAE event.
 Teams will argue that a composite chassis can be made stiffer, for a given weight, than a steel space-frame, and that may well be the case, but how stiff does a FS chassis need to be? Dr. Andy Deakin, Tech Advisor to the UK FS competition, authored a paper on this very subject whilst leading the Leeds Fs team about a decade ago (“The Effect of Chassis Stiffness on Race Car Handling Balance”). There is interesting stuff in there even if Andy was operating with a composite chassis!
I would also remind you that the fastest FS car in the world last year was from Stuttgart, and it used a steel space-frame. Space-frame cars have featured in the Design Finals of every FS/FSAE event and usually are on the podium after the dynamic events.
So, for new teams, considering their options, what is needed to make a good space-frame chassis?
Tube Selection
Firstly, do you use round or square section tubing? A structure made from round section tubing will usually be stiffer in torsion and one of square section may be stiffer in beam. Square section tubing is easier to fabricate (no ‘fishmouth’ joints) but the tube distorts under load by ‘lozenging’ or ‘panting’.This adds to compliance and may lead to fatigue cracking.
Round section tube is preferable, and should a team choose to build a square section chassis, they would need to justify that to the Design Judges. Just stating ‘Easier to fabricate’ will not be enough, after all you could easily have nailed together a wooden chassis if that was sufficient justification. Having said that, there are areas in the chassis where the use of square section tube is preferable.
Incidentally, the difference between the usage of the words ‘tube’ and ‘pipe’ may confuse some teams who do not have English as their first language. Simply stated, tube is described by its outside diameter, pipe is described by its inside diameter, so a 30mm tube is not the same thing as a 30mm pipe and there is no such thing as square pipe!
Many teams will opt for 4130 ‘CroMoly’ tube, but is that necessary? In a word no! Sure, there may be a slight weight saving, but this benefit is not as great as it once was. The rules now stipulate minimum wall thickness in many areas of the chassis, including the heavier components like roll hoops and side impact structures.
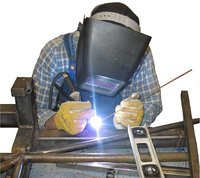
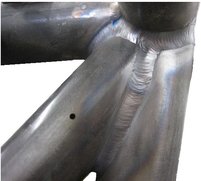 An additional complexity when working with 4130 is the (often debated) need to normalise the structure after welding. I have seen too many catastrophic failures in the HAZ (heat affected zone) of 4130 weldments to know this IS necessary! 4130 suould also be either TIG (tungsten inert gas) welded or nickel bronze welded, a form of brazing. But to quote Ron Tauranac, “The only person who knows it is a good bronze weld is the guy who did the welding”!
I would not recommend ERW (electric resistance welded) tube, I call it ‘furniture tube’, but CDS (cold drawn seamless) tube is perfect, inexpensive, easy to work with and needs no post weld heat treatment (something to consider when you have to weld on some afterthought bracket or repair damage). CDS can also be MIG (metal inert gas) welded, but I would recommend TIG or nickel bronze welding.
Comparing the properties of CDS and 4130 tube is interesting. The difference in strength is not as great as you might think.
CDS is typically 470mpa, and 4130 is typically 650mpa.
Section for section, 4130 is no lighter than any other steel, and all steel has the same modulus of elasticity anyway and are therefore equally stiff. It is only its ability to resist taking a permanent set and the possibility of using a thinner wall section in some parts of the chassis that sets 4130 apart. Equally interesting is a comparison of tube weights and stiffness when comparing diameters and wall thicknesses.
As an example, a 300mm length of 25.4mm x 2.1mm tube has a weight of 368gm, and its moment of inertia (MOI) is .025.
Going up in wall thickness to 3mm increases the weight to 508gm and the MOI to .033. A 40% increase in weight yields a 30% increase in strength.
Going up to the next tube size whilst retaining the original wall thickness, 28.6mm x 2.1mm increases the weight to 418gm and the MOI is now .037.In this case, the weight has increased by 13% and the strength increased by 48%, showing how important it is to determine what loads the tubes will be subjected to before choosing the diameter and wall thickness.
Some teams choose to have their A arms fabricated in 4130 tube. This sounds like a good idea, but in truth, most production race cars such as Formula Ford or Formula 3 use mild steel tube in their A arms. This is because they fail in an accident before the chassis attachments fail. It is easier and cheaper to replace suspension components than it is to repair chassis!
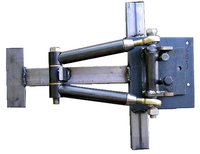 If you choose to have A arms or other components fabricated in 4130 but do not have the correct welding machine or expertise, this tip will help.
It is acceptable practice to tack the components together in a fixture using a simple MIG welder. Then take the tacked assemblies to a qualified welder to have them TIG welded and heat treated if necessary.
Fabrication
Space-frames, by their nature, should not have bent tubes, however, the main roll hoop and possibly the front roll hoop will need to be bent. The technical inspectors will inspect these bends and a chassis will be rejected if the bends are stretched, pinched or wrinkled, or if the tube has become excessively ovalised. There is a rule on minimum roll hoop tube thickness, which will decrease on the outside of a bend.
Correct bending of tubes is difficult, and I would suggest having them bent professionally. Tubes are bent in a ‘Tube bender’, not a ‘Pipe bender’ for reasons explained earlier.
All bends have a start and finish point, and the measurements and radius are taken from the centre line of the tube. For example the centre line radius of the bend in a 38mm tube might be 165mm, but the radius of the inside of the bent tube is actually 145mm.
Don’t listen to people who say you can bend tube by filling it with sand and heating it cherry red. I cannot think of a better way to destroy a perfectly good piece of tube! I know this because I have tried it!
Joining square tubes is relatively simple. Tube ends can be prepared with no more tooling than a hacksaw.
Round tubes are a different matter, especially because good fabrication requires minimal joint gaps. Weld should never be used to fill up open spaces.
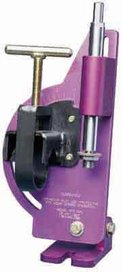 The type of tube end preparation is called ‘fish mouthing’ and can be very difficult. Most current CAD programs have a feature where the tube joints can be ‘unwound’ to see the shape of the tube. This can be printed on paper which is then cut with a scissors to the required shape. The paper is then wrapped around the tube and the tube marked. The fishmouth can then be cut with an aviation snips tool, or carefully ground and filed.
There is a shareware program available on the net to make fishmouth templates if that feature is not included in your CAD program.
There are specialised tube end preparation tools available if you can afford them. They use a fixture to hold the tube and cut the fishmouth with a hole saw of the correct size.
You will need a few other tools to help make life easier. A good quality angle finder with a magnetic base, magnetic work holders and a tube centreline marker, easily made from an off cut of angle. Alternately, the centreline can be found by laying the tube flat on the work table, marking along the side with blue and then sliding a set square along the tube to mark the centreline.
Hopefully there is enough here to get any team started on a space-frame FSG car.
Pat’s Design Error of the Month
This month’s errors must relate to failed welds in space-frame chassis.
The first picture shows two weld failures in the HAZ area. This chassis had not been normalised after welding. Note that the breaks are not at the weld, but in the tube 4 to 6mm from the tube junction.
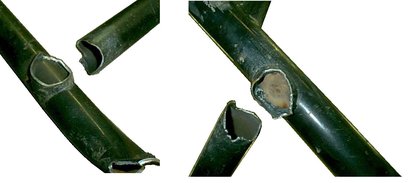
The next picture shows a poorly welded component that caused a team to have a DNF in the US a few years ago.
But, just for fun, how many other Design faults can you see in this picture?
That is enough for this time. FSG teams should now be ready to test. Spring is here and the weather is warming.
Remember to keep safe when testing!
Pat


